Welcome to your first INFO 2602 Lab.
In this codelab you will:
- Get a brief introduction to python syntax
- Understand how FastAPI works
- Explore Routes
- Explore Route Parameters
- Explore Query Parameters
Task 1
Open VSCode and create a new file named main.py. This file should be saved in a convenient location. Use that file to run the snippets of code below and observe the output. Feel free to modify the code a bit to change the outputs. It's highly encouraged that you actively try and understand the code and not just copy-paste the provided code into the editor.
If you get any errors when running the code, or if you have any questions, feel free to raise them to the lab demonstrator Mr Nicholas Smith aka the GOAT and he would provide assistance where necessary
Variables Assignment & Operators
Python, like javascript, is dynamically typed. There is no keyword for declaring or initialising variables, therefore an assignment looks just like an initialization in python.
# Comments in python begin with a single hashtag

x = 10 # Variables are declared and initialized without type keywords
print(x) # A value can be printed out using the print function

x = 23 # Variables can be reassigned
print(x)

y = None # Variables can be declared but not assigned to a value
# by using the keyword "None" (null doesn't exist in python)
print(y)

y = 2

z = ( x + y)/x + (78%3) #usual mathematical operations supported
print(z)
Primitive Types and Strings
Our primitive data types are as follows:
name = "bobby"
nameType = type(name)
print(nameType) # This should indicate that the variable is a string (<class 'str'>)


age = 12
ageType = type(age)
print(ageType) # This should indicate that the variable is an integer (<class 'int'>)


height = 6.5
heightType = type(height)
print(heightType) #<class 'float'>

hasDate = False
hasDateType = type(hasDate)
print(hasDateType) #<class 'bool'>

comp = 7j
compType = type(comp)
print(compType) # <class 'complex'>

# using fstrings for interpolation

message = f'Hi my name is {name} I am {age} years old'
print(message) # ‘Hi my name is bobby I am 12 years old'

# type casting to convert types
intHeight = int(height) # 6
strHeight = str(height) # '6'
floatHeight = float(intHeight) # 6.0
Input Output
name  = input("Enter name: ") # reads input
print (name) # prints output
Comparison
If statements do not use parenthesis () or squiggly braces {} instead it uses a colon : and indentation is used to delimit the condition and scope.
#correct
if 3 > 5:
  print("more") # The body of the if statement is this single line
else :
 print("less") # The body of the else statement is this single line

# Single line if-else statements can be written like this
# However this makes the code unreadable and is discouraged
if 3 > 5: print ("more")
else : print ("less")

# "else if" in python is written as elif
mark = input("Enter mark: ")
mark = int(mark)
if mark > 70:
  print("A")
elif mark > 60: # Note the use of "elif"
  print("B")
elif mark > 50: # Note the use of "elif"
  print("C")
else:
  print("F")
Iteration
i = 1
while i < 10:
 print(i)
 i+=1
else:
 print("This is run when the loop condition is no longer met")

# iterating an iterable such as a list
list = ["bob", "sally", "john"]
for j in list:
 print(j)

# iterating between custom range an increment
for i in range(0, 10, 2):
 print(i)
Functions
#basic function
def add(a, b):
    return a + b

def printPerson(name, age, height):
    print(name, age, height)

# you can specify arguments in any order if they are named
printPerson(age=12, name='bob', height=5)

#default arguments are used when they are not given in the function call
def sayHello(fname, lname='Smith'):
    print('Hello '+fname + ' ' + lname)

sayHello('John')

sayHello('Bill', 'Young')

# functions can return multiple values
def multiReturnFunc(a,b):
    return a+b, a-b, a*b, a/b

# You can assign multiple variables to the values being returned by the function
numSum, numDiff, numMult, numDiv = multiReturnFunc(10,5)
print(numSum, numDiff, numMult, numDiv)
Lists
Lists are your arrays in python, they can include elements of different data types.
list = ['item1', 'item2', 'item3']
list2 = [12, 33, 45, 58, 23]

print(list)
# negative indexing can access elements starting from the end
print(list2[-1])

# select a subset of a list
print(list2[2:4])

# gets the length of a list
print(len(list2))

#add items to list
list.append('item4')

#remove item from list
item4 = list.pop()

#copy list
list3 = list2.copy()

# list comprehension, lets you create new lists from existing lists

num = [ 1, 2, 3, 4]
doubled = [n*2 for n in num]
print(doubled) # [ 2, 4, 6, 8]
odd = [ n for n in num if n%2 == 1]
print(odd) # [ 1, 3]

# unpacking a list, lets you create variables from items in the list
num = [ 1, 2, 3, 4]
[first, second, *rest] = num
print(first)
print(second)
print(rest)
# joining lists
num2 = [5, 6]
num3 = num + num2
print(num3) # [1, 2, 3, 4, 5, 6]

# copying lists
num4 = num2.copy()
Tuples
Tuples are collections that are ordered and unchangeable, because of this they are faster than lists.
thistuple = ("apple", "banana", "cherry", "apple", "cherry")
print(thistuple); # ('apple', 'banana', 'cherry', 'apple', 'cherry')
print(thistuple[0); # ‘apple'
Sets
Sets are collections that do not allow duplicates, they are useful for algorithms that need to keep track of unique occurrences.
data = [ 20, 3, 20, 42, 2, 3, 10, 32, 2]

myset = {0, 1}

for num in data:
 myset.add(num)

print(myset)# {0, 1, 2, 3, 32, 42, 10, 20}
num_unique = len(myset)
There's also a number of useful methods available on sets such as issubset(), intersection() and difference().
Dictionaries
Dictionaries are the python equivalent of Javascript's object literals. They are simply key value pairs and work
mydict = {
        "name":"bob",
        "age": 34
}

print(mydict)

# assessing a key
print(mydict['age'])

# adding a new key and value
mydict['height'] = 7

# iterating keys
for key in mydict:
        print(key)

# iterating values
for key in mydict:
        print(mydict[key])

# check for a key
if 'weight' in mydict:
        print(mydict['weight'])
else:
        print('no weight property!')
Classes
Classes allow us to specify a blueprint for creating instances/objects with state and behaviour in the form of properties and methods.
They differ from dictionaries in that they can exhibit OOP such as inheritance and polymorphism. We use the "." to access an objects' properties while we use [] to access the values of a dictionary for a given key.
#Parent class
class Person:

  def __init__(self, name, height, weight):
    self.name = name;
    self.height = height;
    self.weight = weight;

  def sayHello(self):
    print("Hello! I'm a person, my name is", self.name)

# Child class inherits from Person
class Student(Person):

        # super is the reference to the parent class Person so
        # we call Person's constructor here to set the Person
        # properties of the student instance
        def __init__(self, stid, name, height, weight):
                super().__init__(name, height, weight)
                self.stid = stid

        # override method of parent
        def sayHello(self):
                print("Hello! I'm a student, my name is", self.name)


bob = Person('bob', 12, 34)
sally = Student(123, 'sally', 7, 34)

bob.sayHello();
sally.sayHello();

print(bob.name);
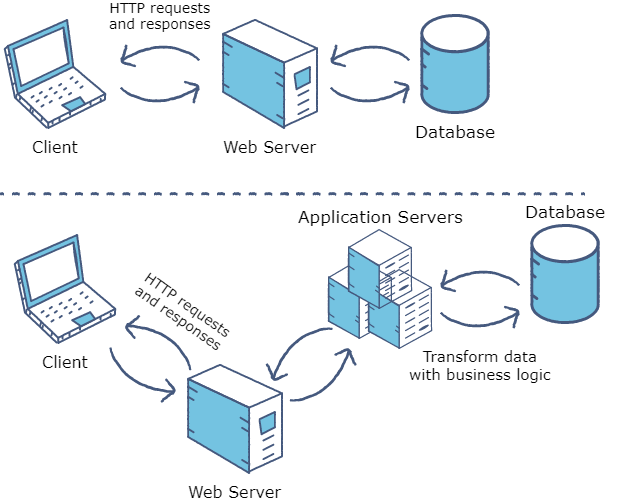
FastAPI is a backend framework for creating application servers in python. As was discussed in the lecture, application servers are just programs which sit on the network, receive requests on a set of specific urls and return http responses.
FastAPI allows us to write routes which are just functions that are executed based on the url of the requests it receives.
Task 2
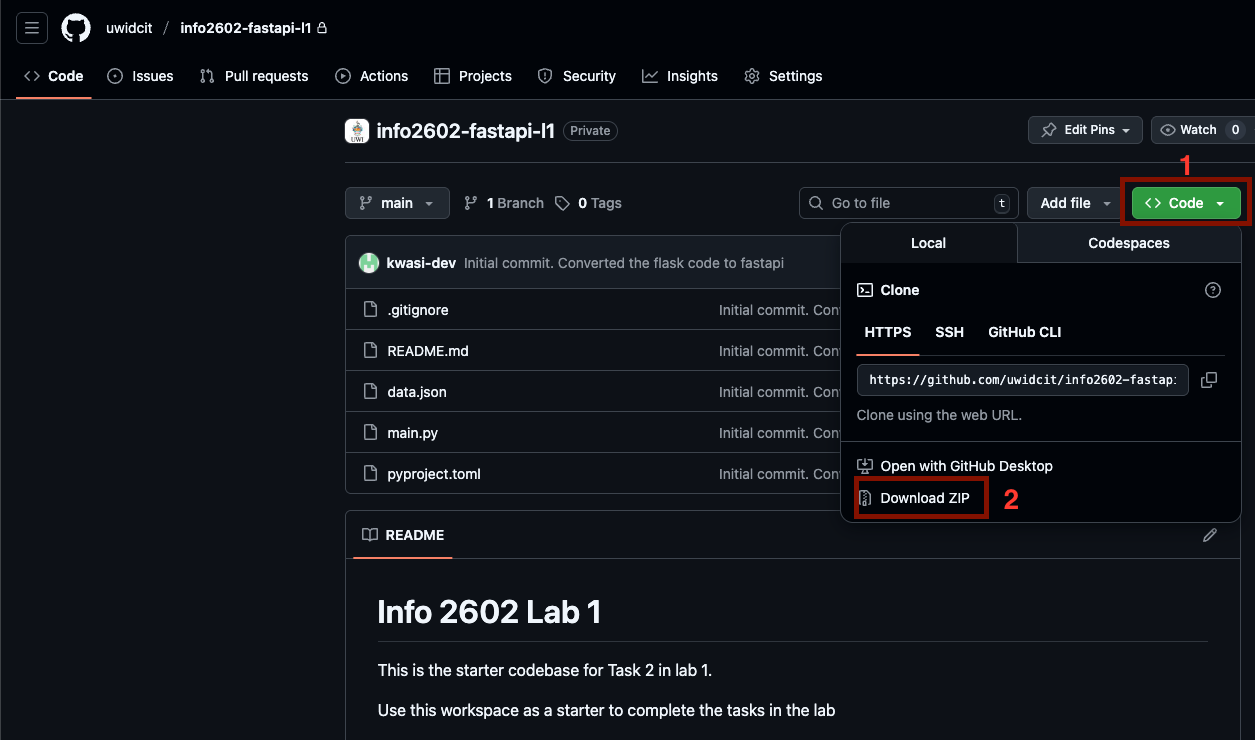
After downloading the zip file, perform the following steps before proceeding to the next section
- Extract the zip file into a folder
- Open the folder in VSCode. (Ensure the folder you opened has the 4 files for the lab. i.e. it is the parent folder of the 4 files)
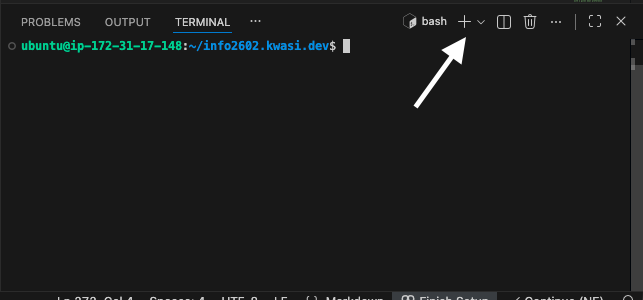
- Open the VSCode terminal
Menu > Terminal > New Terminal - For WINDOWS users, select the dropdown and ensure your shell is a command prompt and not powershell. Please note that if you see PS at the start of the line in the the terminal, your shell is incorrect
- Create a virtual environment by executing
python -m venv venv - Activate the virtual environment. (Note the type of slashes used for activating a Windows environment vs a linux environment)
- If you're on a WINDOWS machine, run the command
venv\Scripts\activate - If you're on a MAC / Linux machine, run the command
source venv/bin/activate
- If you're on a WINDOWS machine, run the command
- Run the following command in the vscode terminal
pip install -e ".[dev]"(note the quotations) - Run the command to start the development server
fastapi dev. If the above command gives an error, it means that the computer is currently using that port. You can try the command below to run the server on another portfastapi dev --port 9090 - Click the link when your development server is running to open it in the browser. Your browser should say "Hello World". If you ran the command
fastapi dev --port 9090, use this link instead http://localhost:9090
For this lab we will implement routes that facilitate GET requests. This means these routes only allow clients to get data as opposed to sending, deleting or updating.
Task 3
Update main.py with the following
from fastapi import FastAPI
import json

app = FastAPI()

global data

with open('./data.json') as f:
    data = json.load(f)


@app.get('/')
async def hello_world():
    return 'Hello, World!'

### New Function
@app.get('/students')
async def get_students():
    return data
### End of new function
Click the following link to see the results. It should be similar to the image below 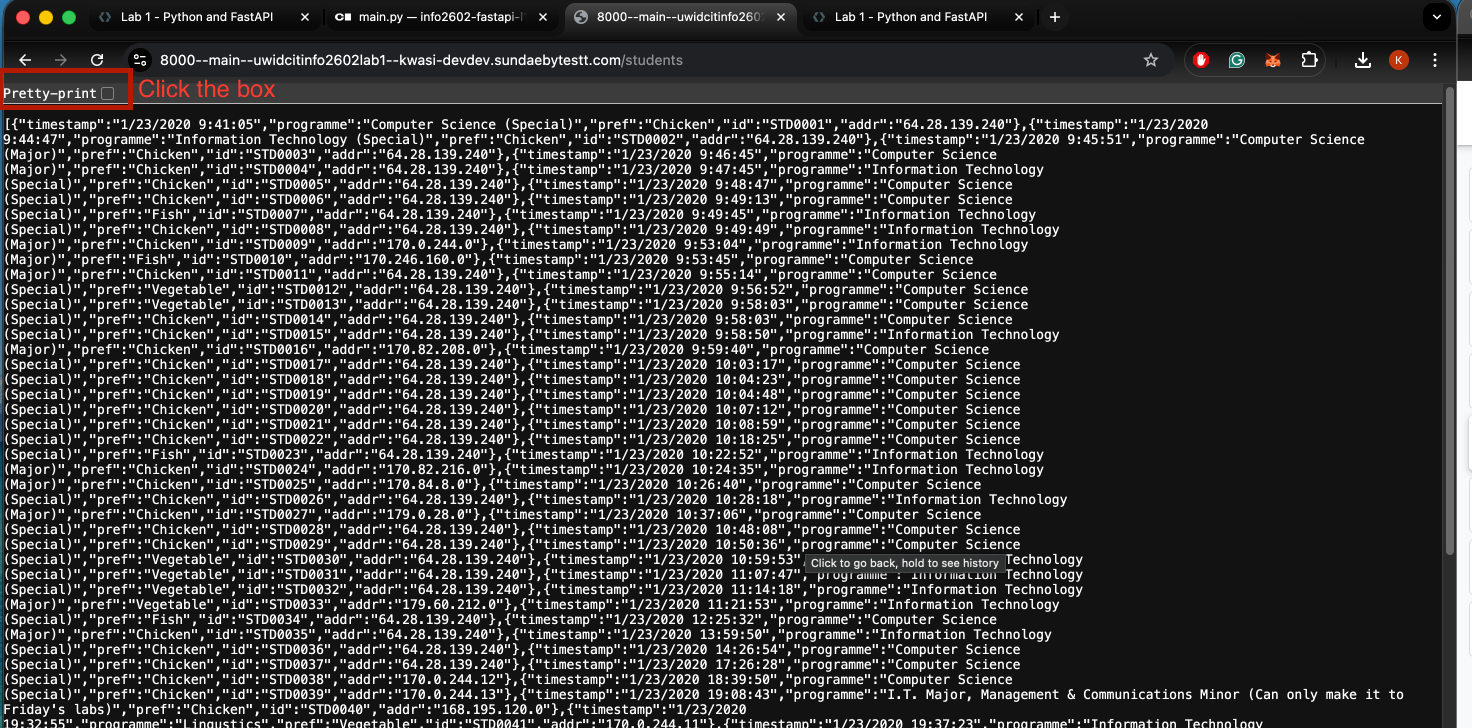
We can configure our routes to treat part of the url path as variables to take as input into the logic of the function. We usually do this to specify an id in our url some examples:
- <host>/photos/342 (example URL that would get a photo with id 342)
- <host>/dogs/2/toys/5 (Example URL that would get the 5th toy of the dog with id 2)
URI Breakdown.

Note the anchor is only available in the browser, it will not be sent to the server side environment.
Task 4
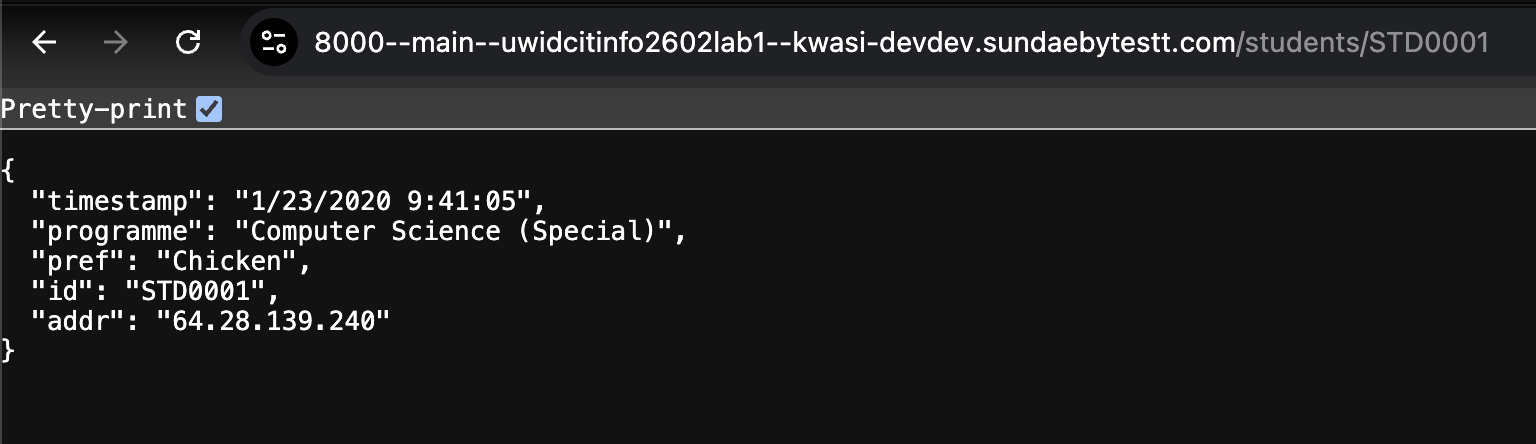
Update main.py with the following route to receive a student id in the url so that we can return data for only one student.
@app.get('/students/{id}')
async def get_student(id):
  for student in data:
    if student['id'] == id: # Only return the student if the ID matches
      return student
Once this is complete, click the link. The results should look similar to the image below
For more advanced querying such as ranged queries, searching and filtering we use query parameters as input on the url. It is typical to design query parameters as optional such that there is a fallback response if none are supplied by the user.
Task 5
Update the get_students function in main.py to allow a query parameter ‘pref' that filters the dataset by a specified meal preference.
@app.get('/students')
async def get_students(pref=None):
    if pref:
        filtered_students = []
        for student in data:
            if student['pref'] == pref: # select only the students with a given meal preference
              filtered_students.append(student) # add match student to the result
        return filtered_students
    return data
Click the link to see a list of students whose preference is Chicken
The next two sections are exercises that you should attempt and submit them for this lab in myElearning
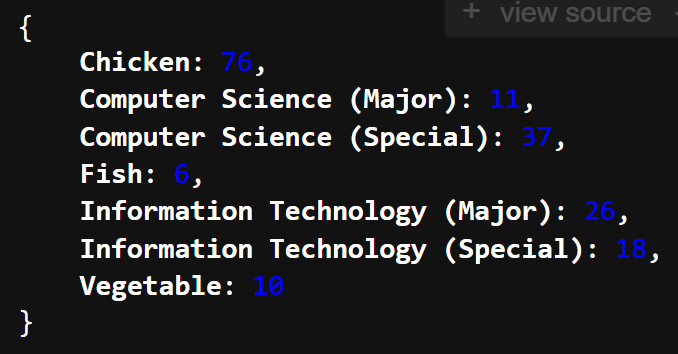
Exercise 1
Create a route /stats which returns a count of the various meal preferences and programmes in the data set eg.
Exercise 2
Create additional routes; /add/a/b, /subtract/a/b, multiply/a/b and divide/a/b that takes in 2 route parameters a and b and returns the result of the calculation.